Testing S/
Photo Credits: Unsplash, Wikipedia , and Flat Icons
Introduction
S/MIME, or Secure/Multipurpose Internet Mail Extensions, is a commonly used method of providing integrity and confidentiality for email messages - though enterprises are increasingly switching to cloud-managed alternatives, like Proofpoint or Purview message encryption.
A recent client - themselves in the process of transitioning to a new encryption solution - asked me to test their new tool and S/MIME encryption side-by-side in an M365 tenant to determine whether they would conflict or "play nice."
Typical Configuration
In a traditional enterprise environment, S/MIME certificates would be issued via a Windows PKI and distributed via Active Directory. In a modern enterprise environment, organizations would add the steps of:
- Importing root & intermediate certificates to Exchange Online
- Syncing user certificates to Microsoft 365, typically with Entra (AAD) Connect
- Configuring email clients to use certificates
See Microsoft documentation for more details.
My Configuration
I was not inclined to install a Windows CA and Entra Connect for a test environment, so I opted for a simpler approach with OpenSSL self-signed certificates, which I've documented below.
OpenSSL CA and User Certificates
Create a self-signed CA certificate and use it to issue two or more user certificates for user identities within the test M365 tenant:
CA_NAME="Example-CA"
USER_1="user1"
USER_2="user2"

# Create CA Cert
openssl req -nodes -new -x509 -days 3650 -newkey rsa:4096 -keyout ca.key -out ca.crt -extensions v3_ca -subj "/CN=$CA_NAME"

# Create User Keys and CSRs
#  - for interactive prompts - only necessary field is Email Address
openssl req -nodes -new -newkey rsa:4096 -keyout smime_$USER_1.key -out smime_$USER_1.csr
openssl req -nodes -new -newkey rsa:4096 -keyout smime_$USER_2.key -out smime_$USER_2.csr

# Sign the CSRs
openssl x509 -req -days 3650 -in smime_$USER_1.csr -CA ca.crt -CAkey ca.key -set_serial 1 -out smime_$USER_1.crt -addtrust emailProtection -addreject clientAuth -addreject serverAuth -trustout -extensions smime
openssl x509 -req -days 3650 -in smime_$USER_2.csr -CA ca.crt -CAkey ca.key -set_serial 1 -out smime_$USER_2.crt -addtrust emailProtection -addreject clientAuth -addreject serverAuth -trustout -extensions smime

# Bundle Keys and Certs
#  - you will be prompted for a password
openssl pkcs12 -export -in smime_$USER_1.crt -inkey smime_$USER_1.key -out smime_$USER_1.p12
openssl pkcs12 -export -in smime_$USER_2.crt -inkey smime_$USER_2.key -out smime_$USER_2.p12
Add CA to M365 (and Windows)
- Move the certificate files to a Windows machine
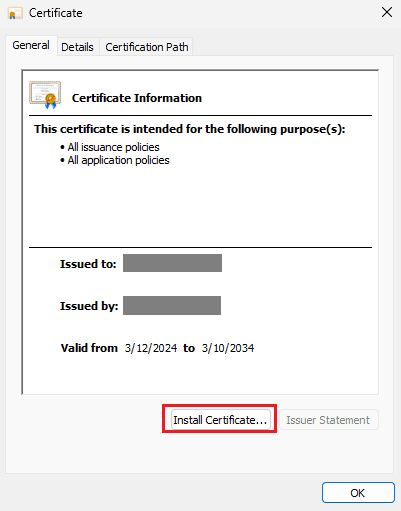
- Install the certificate on the local machine with the following steps:
- Double-click
ca.crt> - "Install Certificate" >
- "Local Machine" >
- "Place all certificates in the following store" >
- "Trusted Root Certification Authorities" >
- "Yes"
- Double-click

- Export the certificate in
SSTformat for subsequent import to M365
$CA_NAME = "Example-CA"
$cert = Get-ChildItem -Recurse -Path Cert:\LocalMachine\ | ? Subject -eq "CN=$CA_NAME"
Export-Certificate -Cert $cert -FilePath "./ca.sst" -Type SST
- Upload the certificate using Exchange Online PowerShell
Connect-ExchangeOnline
Set-SmimeConfig -SMIMECertificateIssuingCA ([System.IO.File]::ReadAllBytes("./ca.sst"))
Install and Upload User Certificates
For this step, I used two local user accounts on my testing Windows machine. The user accounts do not have to be AD or Entra accounts, and the device does not need to be AAD/Entra-joined. However, M365 identities from the test tenant must be used to authenticate with Outlook.
Sign-in to one of the local user accounts and perform the following steps:
- Sign-in to Outlook with one of the M365 identities
- Import the user certificate
- "File" >
- "Options" >
- "Trust Center" >
- "Trust Center Settings" >
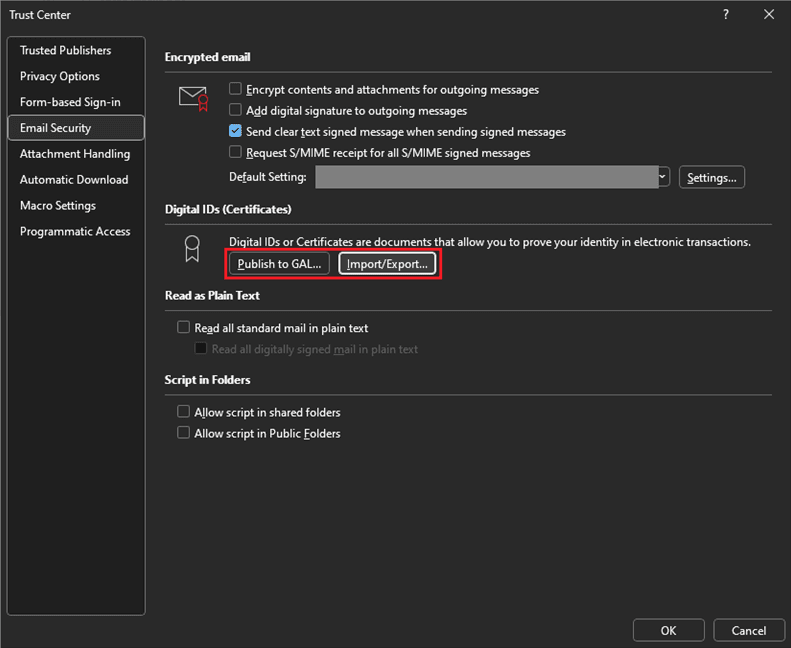
- "Email Security" >
- "Import/Export"
- "Browse" > Select the correct user certificate file and enter the password >
- "OK"
- Publish the user certificate to the Global Address List (GAL)
- still on the Trust Center Settings page
- "Publish to GAL" >
- watch your taskbar for a UAC-like permission prompt that does not always bring itself to the top of the screen
- "OK" >
- "OK"

Repeat this process with a separate local user account and the other M365 identity.
Test Configuration
Validate User Certificates
(Optional) To verify that the user certificates were successfully published:
$user1 = "user@domain.com"
Connect-ExchangeOnline
Get-Mailbox -Identity $user1 | Select-Object -Property UserPrincipalName, UserSMimeCertificate
The UserSMimeCertificate property should be non-null. It could be checked against the uploaded certificate to verify integrity, but this is generally unnecessary
Send Encrypted Emails
To send an S/MIME-encrypted email:
- Sign-in to Outlook with one of the two M365 identities >
- "New email" >
- "To" >
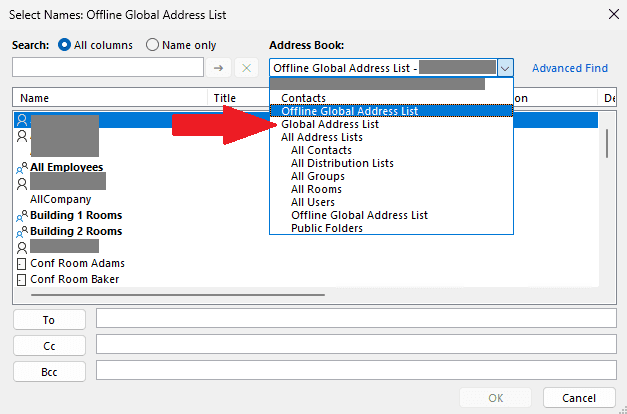
- Select the Address Book drop-down and switch from "Offline Global Address List" to "Global Address List"
- The offline GAL does not yet know about the two users' certificates, and an error will be received when attempting to send the email if the online GAL is not used
- This error will also be received if using Outlook's "auto-complete" feature in the "To" line

- "Options" >
- "Encrypt" >
- "Encrypt using S/MIME"
- "Send"

- Switch user accounts and open Outlook
- The test email should appear with a padlock icon in your inbox

- A UAC-like permissions prompt should appear when you first open an encrypted email. Following the initial permissions grant, Outlook will transparently decrypt S/MIME-protected emails using the user key previously imported.
