Automating PowerPoint
Photo Credits: Unsplash, Tech Icons, and Icon Finder
Introduction
It is occasionally useful to automate PowerPoint creation and/or customization.
Consider:
- Creating a presentation from large quantities of pre-existing content in a CSV or other structured format
- Customizing a mostly-boilerplate presentation for each client you present to
- Filling in the specific results of an analysis for a standardized engineering report
- Replacing some or all existing content with character-for-character 'lorem ipsum' text to convert a sensitive report into a non-sensitive template or example
This article was inspired by my recent need to create a training presentation addressing 100+ pre-determined training objectives. I wanted to create at least one slide per training objective and add the objective reference ID and text to the slide body to clearly demonstrate compliance. Rather than copy/paste 200+ times, I decided to script out the creation of the slides - though I still need to go back and fill in the training content.
PowerPoint in PowerShell
PowerShell can interact with PowerPoint through the PowerPoint.Application COM Object.
For general information on using COM Objects in PowerShell, see my Intro to PowerShell
The "object model" used by the COM Object appears to mirror that documented for VBA here. You can also explore the available properties and methods on each object using PowerShell's Get-Member or other .NET methods of finding object members, constructors, etc.
Example Usage

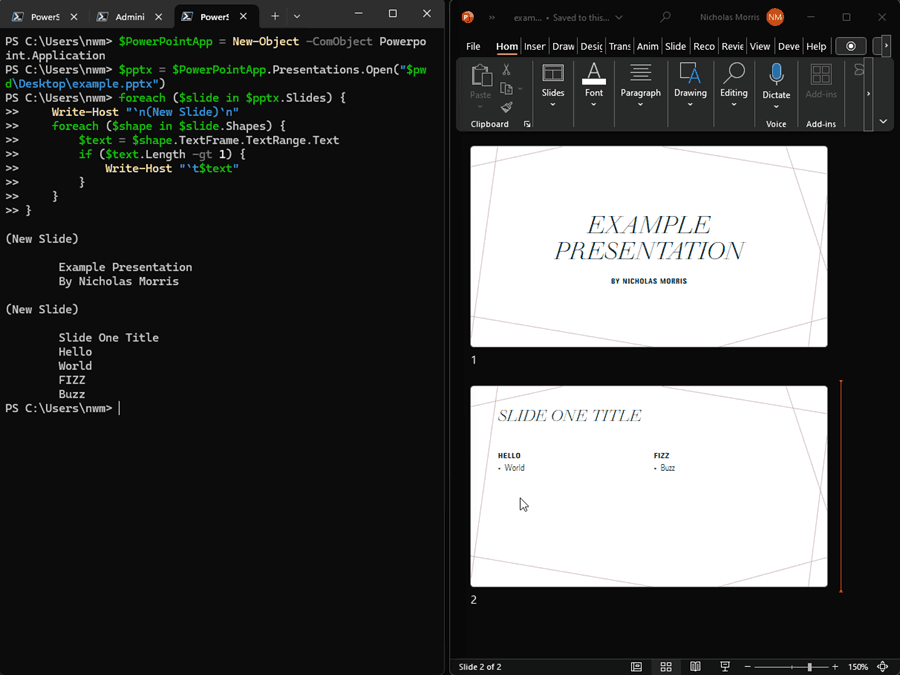
Commands from the example:
# open application
$App = New-Object -ComObject Powerpoint.Application
# open presentation
$pptx = $App.Presentations.Open("$pwd\dev\example.pptx")
# iterate through the existing slides
foreach ($slide in $pptx.Slides) {
    # write to the console to separate out the content from each slide
    Write-Host "`n(New Slide)`n"
    # iterate through the slide's shapes
    foreach ($shape in $slide.Shapes) {
        # retrieve any text that may be within said shape
        $text = $shape.TextFrame.TextRange.Text
        # if there's text, write it to the console
        if ($text.Length -gt 1) {
            Write-Host "`t$text"
        }
    }
}
Selected Methods and Properties
The following represent the most useful (to me) properties and methods in the Powerpoint.Application object model.
| Entity | Example Command | Shorthand |
|---|---|---|
| Application Object | New-Object -ComObject Powerpoint.Application | $App |
| Open a Presentation | $App.Presentations.Open(<path>) | $pptx |
| Create a New Presentation | $App.Presentations.Add() | $pptx |
| Slide Array | $pptx.Slides | $Slides |
| Slide Object | $pptx.Slides[<index>] | $slide |
| Slide Master | $pptx.SlideMaster | $SlideMaster |
| Layouts | $SlideMaster.CustomLayouts | $layouts |
| Layout Placeholders | $layouts[<index>].Shapes.Placeholders | $placeholders |
| Slide Placeholders | $slide.Shapes.Placeholders | $placeholders |
| Placeholder Text | $placeholders[<index>].TextFrame.TextRange.Text | $text |
Retrieving or altering the text within a placeholder is as simple as displying or setting the value within the $text member.
Important Note: Array-like properties exposed by the PowerPoint COM Object are NOT 0-indexed, meaning the first slide in the $pptx.Slides member is index 1, not index 0.
Using Slide Master
Automating PowerPoints is most straight-forward if you make use of the Slide Master feature. If you're not familiar, I recommend getting up to speed here.
As a crash course:
- The layouts available in the "New Slide" menu are defined by the Slide Master
- Editing the Slide Master will immediately apply formatting changes to all slides based on relevant layouts
A PowerPoint's custom layouts can be accessed with the $pptx.SlideMaster.CustomLayouts array. Each layout has a Name property that matches the name displayed in the "New Slide" dropdown. The name can also be set, either with PowerShell or in the "View > Slide Master" menu in PowerPoint.
A slide can be created from a custom layout with $pptx.Slides.AddSlide(<new slide index>, $layout). I typically call this method with something like the following:
$comparisonLayout = $pptx.SlideMaster.CustomLayouts | ? Name -match "Comparison"
$pptx.Slides.AddSlide($pptx.Slides.Count + 1, $comparisonLayout)
Identify Layouts and Placeholders
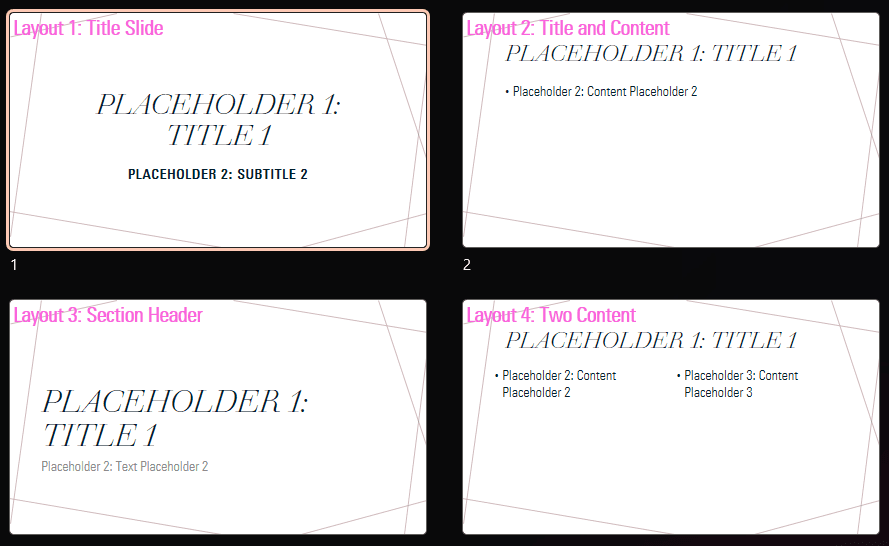
The placeholders within a given layout can be a little tricky: each has a name and an order within the slide's Shapes.Placeholders array, but neither are guaranteed to be intuitive. Experimentation is the best method to determine which placeholder is which.
The following script will:
- Create one slide of each layout
- Fill each placeholder with text indicating the placeholder name and index
- Add a new shape to indicate the layout's name and index
function Show-PptxLayouts {
	param(
		[ValidateScript({if($_){Test-Path $_}})]
		[string]$PptxTemplate
	)
    # open the app and presentation
	$PowerPointApp = New-Object -ComObject Powerpoint.Application
	$file = Get-Item $PptxTemplate
	$pptx = $PowerPointApp.Presentations.Open($file.FullName)
	# retrieve all of the slide master layouts
    $layouts = $pptx.SlideMaster.CustomLayouts
	# for each layout...
    for ($i = 1; $i -le $layouts.Count; $i++) {
		# create a new slide
        $active = $pptx.Slides.AddSlide($pptx.Slides.Count + 1, $layouts[$i])
		# get all the placeholders
        $placeholders = $active.Shapes.Placeholders
		# for each placeholder...
        for ($j = 1; $j -le $placeholders.Count; $j++) {
			$placeholder = $placeholders[$j]
			# add text indicating the placeholder index and name
            # (try/catch because some placeholders are for images, not text)
            try {
				$placeholder.TextFrame.TextRange.Text = `
					"Placeholder $j`: $($placeholder.Name)"
			} catch {}
		}
        # add a textbox to the slide to indicate the layout name and index
		$textbox = $active.Shapes.AddTextbox(1, 0, 0, 500, 100)
		$textRange = $textbox.TextFrame.TextRange
		$textRange.Text = "Layout $i`: $($layouts[$i].Name)"
		# RGB stored as the decimal representation of three 8-bit numbers
        # e.g., (249, 99, 220) --> 14443513
        $textRange.Font.Color.RGB = 14443513
		$textRange.Font.Size = 32
		$textRange.Font.Bold = $true
	}
    # remember to close the app!
	$PowerPointApp.Quit()
	# returns the pptx, leaving the user to save and close it
    return $pptx
}
Script Output:

Some notes on the above script:
[ValidateScript({if($_){Test-Path $_}})]checks that the passed-in variable is a valid path and throws an error if it is not- The function signatures for methods within the
PowerPoint.Applicationobject model can be checked in two ways: reviewing the documentation or checking the.OverloadDefinitionsproperty- Note that the function signatures occasionally reference
Enumsthat have to be looked up here
- Note that the function signatures occasionally reference
- The
$textRange.Font.Color.RGBproperty accepts/displays a three-byte RGB sequence as the decimal representation of all three bytes smashed together- Examples:
- (255, 0, 0) --> 255
- (55, 55, 55) --> 3618615
- (249, 99, 220) --> 14443513
- I couldn't find this in the documentation but discovered it via "guess and check"
- You can convert an RGB array into the desired output with the following:
- Examples:
$rgb = @(249, 99, 220)
$rgb[0] -bor ($rgb[1] -shl 8) -bor ($rgb[2] -shl 16)
Example Script
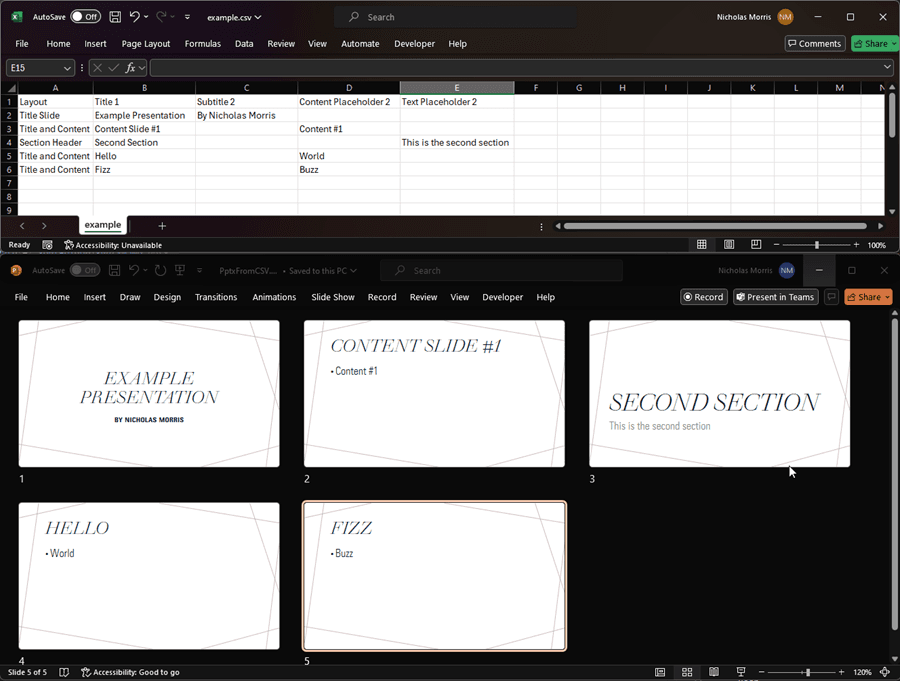
To create a PowerPoint from content in a CSV file, try the following function with a CSV that contains:
- A "Layout" field indicating which slide layout to use
- An arbitrary number of fields with names corresponding to the target placeholders
(See my example CSV and resulting PowerPoint at the bottom of the page)
function New-PptxFromCsv {
    param(
        [ValidateScript({if($_){Test-Path $_}})]
        [string]$PptxTemplate,
        [ValidateScript({if($_){Test-Path $_}})]
        [string]$Csv,
        [Parameter(mandatory=$true)]
        [string]$PptxName,
        [string]$DestinationFolder
    )
    # Validate destination folder
    try {
        $outFolder = Get-Item -Path $DestinationFolder
    } catch {
        Write-Warning "Could not find folder at the provided path. " + `
            "Output will be saved in the current directory instead"
        $outFolder = $PWD
    }
    # get content
    $content = Get-Content -Path $Csv | ConvertFrom-Csv
    # copy before edit
    $outPath = "$outFolder\$PptxName.pptx"
    $iter = 1
    # ensure we don't overwrite an existing file
    while (Test-Path -Path $outPath) {
        $outPath = "$outFolder\$PptxName-$iter.pptx"
        $iter++
    }
    Copy-Item -Path $PptxTemplate -Destination $outPath
    $PowerPointApp = New-Object -ComObject Powerpoint.Application
    # expanded function signature allows us to hide the PowerPoint window
    $pptx = $PowerPointApp.Presentations.Open(
        $outPath, $false, $false, $false
    )
    # get all field names from the CSV (other than "Layout")
    $contentFields = (
        $content | Get-Member | Where {
            $_.MemberType -eq "NoteProperty" -and $_.Name -ne "Layout"
        }
    ).Name
    # for each CSV entry
    foreach ($slide in $content) {
        # create a slide of the designated layout
        $layout = $pptx.SlideMaster.CustomLayouts | ? Name -match $slide.Layout
        $newSlide = $pptx.Slides.AddSlide($pptx.Slides.Count + 1, $layout)
        # for each field in the CSV where there is content
        foreach ($field in $contentFields) {
            if ($slide.$field.Length -gt 0) {
                # add the CSV's content into the placeholder
                $placeholder = $newSlide.Shapes.Placeholders | `
                    ? Name -match $field
                $placeholder.TextFrame.TextRange.Text = $slide.$field
            }
        }
    }
    # save and exit
    $pptx.Save()
    $pptx.Close()
    $PowerPointApp.Quit()
}
Example Output
(using the same layout as the "Identify Layouts" example)

