IPS Deployment Notes
Photo Credits: Unsplash and Microsoft
I: Introduction
Microsoft Purview offers a wide variety of Auditing, Data Governance, and Data Security tools, including the Information Protection Scanner (IPS).
Note: The IPS was previously known as the Azure Information Protection (AIP) scanner.
Purview automatically performs data discovery within your M365 tenant, meaning it scans data within your SharePoint and OneDrive sites, Exchange Online inboxes, and Teams channels for data that matches any "Sensitive Information Type" (SIT) defined within your tenant. SITs are primarily RegEx and keyword-based.
The Information Protection Scanner extends that capability to your on-premises NFS and SMB file shares.
The IPS is a 'deployable' component, meaning you must deploy it on your own infrastructure. To my knowledge, it is the only deployable, infrastructure-like component within Purview - at least, the "M365 side" of Purview.
(Delineating "M365 Purview" vs "Azure Purview" is a discussion for another time.)
Microsoft does provide deployment documentation here and here, but I generally find it hard to follow and/or out of (the optimal) order, hence these notes.
II: Deployment
II.A: Infrastructure
The IPS itself must run on a Windows Server, and it must connect to a Microsoft SQL Server backend. While the MSSQL server may be installed on the same host as the IPS software, it is recommended to use two separate hosts.
This guide will deploy separate hosts for the scanner and for the SQL backend.
An evaluation copy of the Windows Server OS can be downloaded here.
II.A.a: Minimum Specifications
According to Microsoft, the minimum server specifications for the scanning server are:
- 4 cores
- 8 GB RAM
- 64-bit version of Windows Server 2012 R2 or above
- Network connectivity to the target servers, as well as:
- *.aadrm.com
- *.azurerms.com
- *.informationprotection.azure.com
- informationprotection.hosting.portal.azure.net
- *.aria.microsoft.com
- *.protection.outlook.com
- The "Client for NFS" Windows Feature (if NFS shares will be scanned)
II.B: On-Premises Accounts
The IPS is almost always deployed in an Active Directory (AD) environment - though it should be possible to install and use without one. This guide will assume an AD environment.
II.B.a: Service Account
A service account must be created for the IPS. Requirements include:
- "Log on as a service" permissions on the scanning server
- Permissions to all data repositories that will be scanned
- Read access is sufficient for read-only scans
- Write and Modify permissions are required for enforcement and auto-labeling scans
Additional Notes:
- The IPS does NOT support GMSAs - at least, not without a substantial amount of workarounds
- The service account will eventually require permissions on specific databases hosted by the the SQL Server, but these are automatically granted during the installation process.
- If your organization utilizes AD Connect, ensure the service account is synced to Entra - more on this later
II.B.b: Administrator Account
During the installation process, you will require an account with administrative privileges on the two Windows servers. This can be the IPS service account or a separate account. From a security perspective, this should be a separate account to enable least privilege for the IPS account. From a practical perspective - organizations typically use the service account.
II.B.c: Example Setup
There are dozens of ways to achieve the AD account requirements. One possibility (used for this demo):
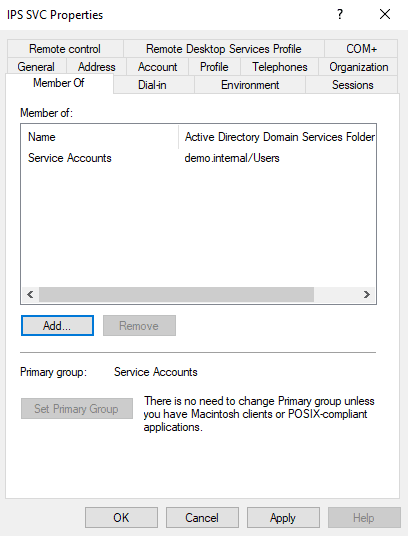
- Create an AD user account to be used by the IPS
- Remove from "Domain Users" to ensure minimal privileges
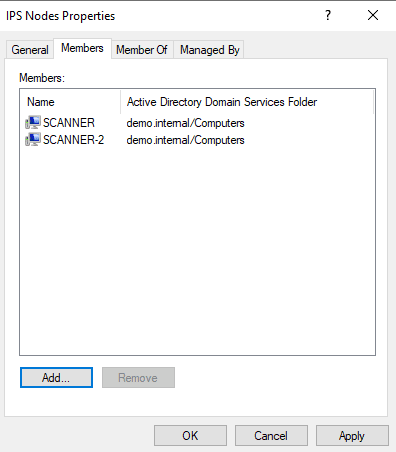
- Add all scanning servers to an "IPS Nodes" AD Computer Group
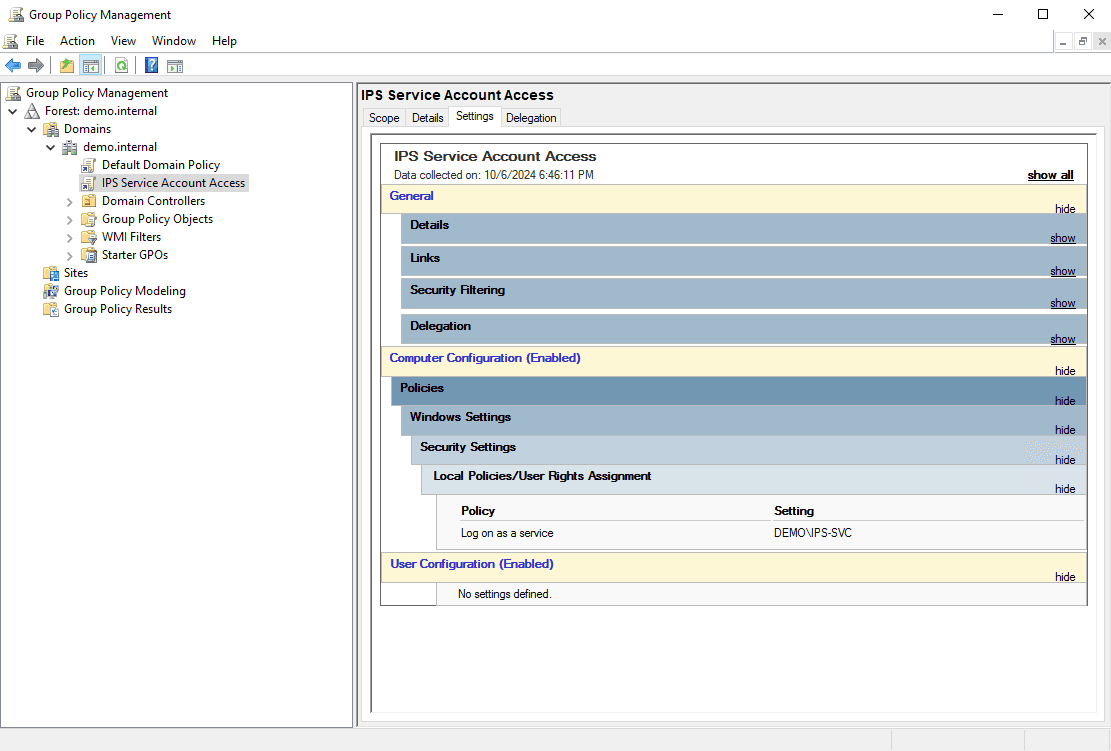
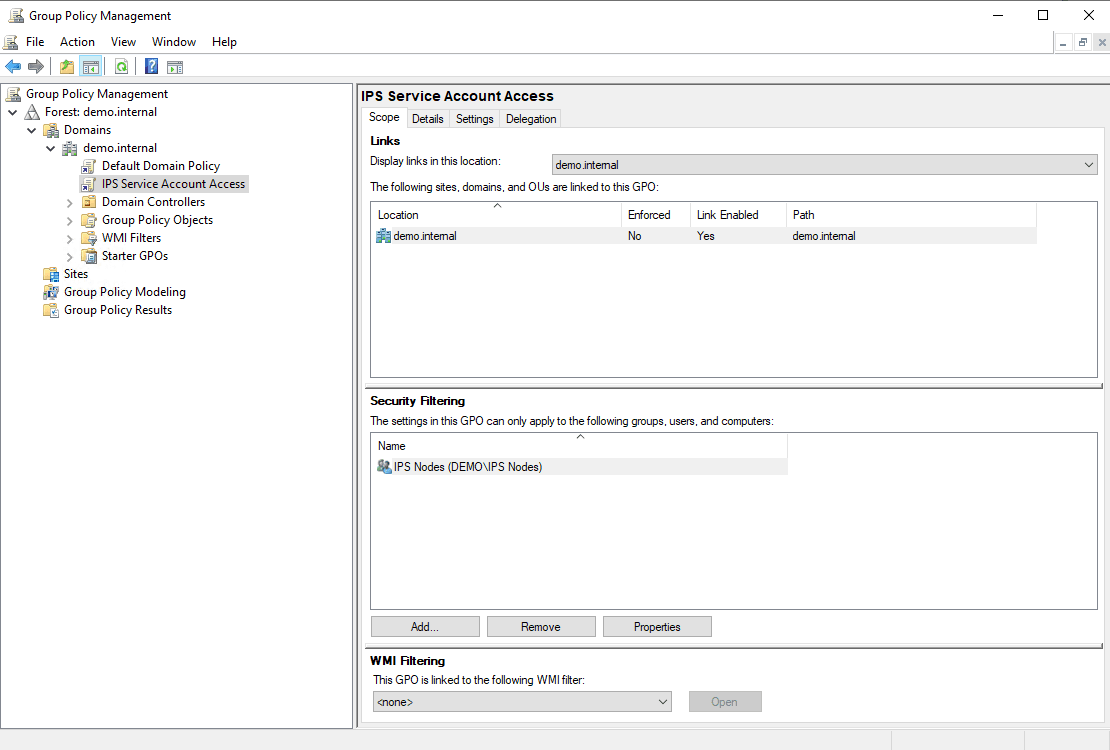
- Use a GPO to grant "Log on as a service" permissions to the service account on all computers in the "IPS Nodes" group
- Create or re-use an existing Administrator account for the setup process
II.B.d: Example Screenshots
- Service account with restricted group memberships:
- AD Computer Group for granting logon rights:
- GPO settings:
- GPO Scope:
II.C: SQL Server Setup
There are no special requirements for the SQL Server. A basic installation of a recent MSSQL edition will work perfectly.
The installation can be scripted or manual. Instructions for both are provided below.
II.C.a: Scripted Installation
The following script will:
- Download and install the developer edition of MSSQL 2022
- Download and install SQL Server Management Studio
- Ensure MSSQL accepts TCP/IP connections
- Add a firewall rule to permit inbound connections
- Add an administrator account (the one you will be using to install the IPS software) to the MSSQL sysadmins group
$admin_name = "YOUR ADMINISTRATOR ACCOUNT HERE"

# Install MSSQL
$outFile = "C:\Users\Administrator\Downloads\mssql22.exe"
(New-Object System.Net.WebClient).DownloadFile(
    "https://aka.ms/sqlserver2022developer",
    $outFile
)
& $outFile `
    /IAcceptSqlServerLicenseTerms `
    /Quiet /HideProgressBar `
    /InstallPath="C:\Program Files\Microsoft SQL Server" `
    /Language=en-US /Action=Install `
    | Out-Default # make powershell wait

# Note: instance name will be "MSSQLSERVER"

# Install SSMS
# https://stackoverflow.com/questions/58919239/
# error-when-trying-to-install-ssms-18-4-version
$outFile = "C:\Users\Administrator\Downloads\ssms-installer.exe"
(New-Object System.Net.WebClient).DownloadFile(
    "https://aka.ms/ssmsfullsetup",
    $outFile
)
& $outFile /install /quiet /norestart | Out-Default # make pwsh wait

# Server Config
[System.Reflection.Assembly]::LoadWithPartialName("Microsoft.SqlServer.SqlWmiManagement")
$wmi = New-Object "Microsoft.SqlServer.Management.Smo.Wmi.ManagedComputer" localhost

# Enable TCP/IP
# source:
# https://learn.microsoft.com/en-us/
# powershell/sql-server/how-to-enable-tcp-sqlps?view=sqlserver-ps
$tcp = $wmi.ServerInstances["MSSQLSERVER"].ServerProtocols["Tcp"]
$tcp.IsEnabled = $true
$tcp.Alter()
Restart-Service -Name MSSQLSERVER -Force

# Permit inbound traffic
New-NetFirewallRule `
	-DisplayName MSSQL `
	-Program 'C:\Program Files\Microsoft SQL Server\MSSQL16.MSSQLSERVER\MSSQL\Binn\sqlservr.exe' `
	-Direction Inbound `
	-Action Allow

# Add admin user to SA role
# source:
# https://stackoverflow.com/questions/
# 47749382/add-user-to-server-role-in-sql-server
$env:PSModulePath += ";C:\Program Files (x86)\Microsoft SQL Server\" + `
    "160\Tools\PowerShell\Modules\"
Import-Module SQLPS
$hostname = [System.Net.Dns]::GetHostByName((hostname)).HostName
$domain = [System.DirectoryServices.ActiveDirectory.Domain]::GetComputerDomain().Name
$domain = ($domain -split "\.")[0]
$server = New-Object 'Microsoft.SqlServer.Management.Smo.Server' $hostname
$login = New-Object `
    -TypeName Microsoft.SqlServer.Management.Smo.Login `
    -ArgumentList $server, "$domain\$admin_name"
$login.LoginType = "WindowsUser"
$login.Create()
$login.AddToRole("sysadmin")
$login.Alter()
II.C.b: Manual Installation
Perform these steps with the administrative account you will be using to install the IPS software.
- Logon to the SQL host
- Download and install MSSQL
- Install SQL Server Management Studio (SSMS)
- Verify remote connections are enabled by...
- Opening SSMS and connecting to the local database
- Ensure "Trust server certificate" is checked
- Right-click the database name, select "Properties", then select "Connections"
- Make sure "Allow remote connections to this server" is checked
- Opening SSMS and connecting to the local database
- Verify TCP/IP is enabled by...
- Opening "SQL Server YYYY Configuration Manager" and selecting "SQL Server Network Configuration"
- Select "Protocols for MSSQLSERVER" and make sure "TCP/IP" is enabled
- If settings were changed, restart the SQL Server using SSMS or Service Manager
- Verify that SQL Server is listening on port 1433
- PowerShell command:
netstat -anb | Select-String -Pattern "1433" -Context 1,0
- PowerShell command:
- Permit inbound connections
- Open Windows Defender Firewall with Advanced Security and add an "Allow" rule for the
sqlservrexecutable - The executable path should be located at:
%ProgramFiles%\Microsoft SQL Server\MSSQL16.MSSQLSERVER\MSSQL\Binn\sqlservr.exe
- Open Windows Defender Firewall with Advanced Security and add an "Allow" rule for the
- Verify connectivity
- Log into the designated scanning server
- Connect to the database using PowerShell (commands below)
- If the
.Open()method succeeds, the SQL server is functioning as expected
# Connect to a database
$sqlHostname = "YOUR SQL SERVER'S HOSTNAME"
$conn = [System.Data.SqlClient.SqlConnection]::New()
$conn.ConnectionString = "Server=$sqlHostname;Database=master;Trusted_Connection=True;"
$conn.Open()
II.D: Entra Setup
The IPS requires two Microsoft Entra (formerly Azure Active Directory) entities:
- An application registration (used to retrieve scanner policies and return results)
- A "Delegated User" (a standard Entra user account used to scope policies)
II.D.a: Delegated User
The Delegated User will determine which auto-labeling policies (if any) the scanner will apply to data. For a discovery-only scan, this is not relevant. What is relevant is that a delegated user is required for the installation process, and that user must be within the scope of one or more Sensitivity Label "publishing policies".
If you synced the IPS service account to Entra during the on-premises setup, use that account's Entra UPN as the delegated user. Otherwise, create a dedicated user in Entra for this purpose.
While not strictly necessary, it's recommended to set your Delegate User as an AIP Super User. To do so, run the commands below:
# AIPService Docs: https://learn.microsoft.com/en-us/powershell/module/aipservice
$upn = "YOUR DELEGATE'S UPN (e.g., user@email.com)"
Install-Module -Name AIPService
Connect-AipService
Enable-AipServiceSuperUserFeature
Add-AipServiceSuperUser -EmailAddress $upn
II.D.b: Application Registration
- Navigate to the Entra Portal
- Click App Registrations > New Registration
- Leave Supported account types as default.
- Set the Redirect URI as type 'Web' with the address 'http://localhost'
- Note the App ID and Tenant ID
- Navigate to Certificates and Secrets > New Client Secret
- Copy the secret value
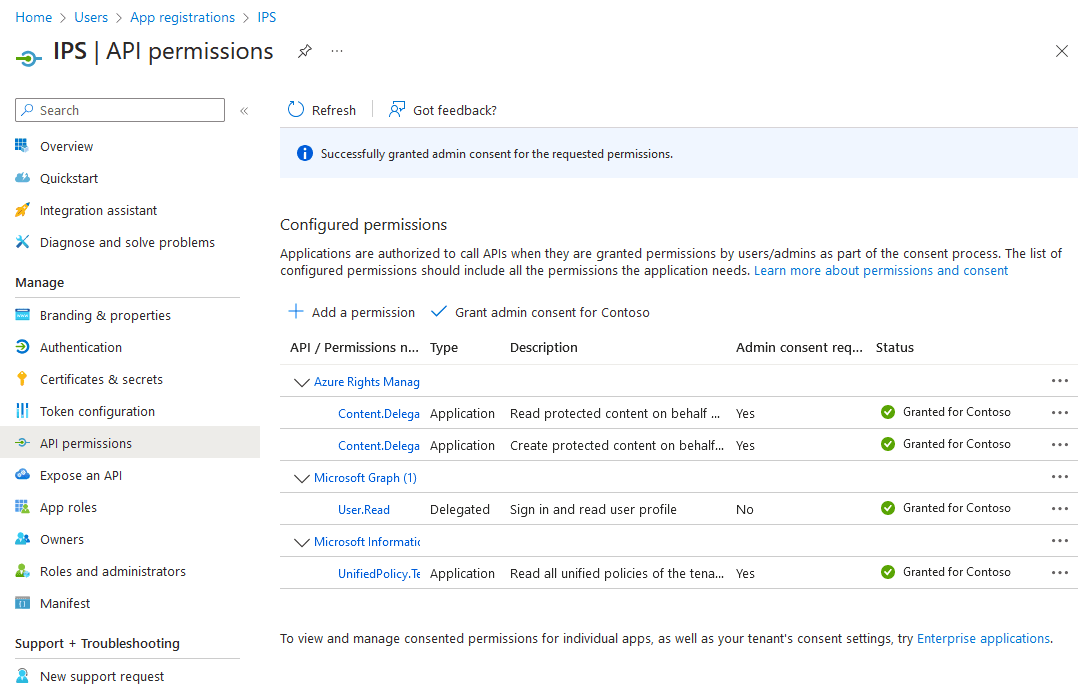
- Navigate to API Permissions > Add a permission
- Select Azure Rights Management Service > Application Permissions
- Select
Content.DelegatedReaderandContent.DelegatedWriter
- Add another permission
- Click on 'APIs my organization uses' and search 'Microsoft Information Protection Sync Service'
- Select Application Permissions >
UnifiedPolicy.Tenant.Read
- Click 'Grant Admin Consent'
II.D.c: Example Screenshots
- Application Registration permissions (after admin consent is granted):
II.E: Purview Setup
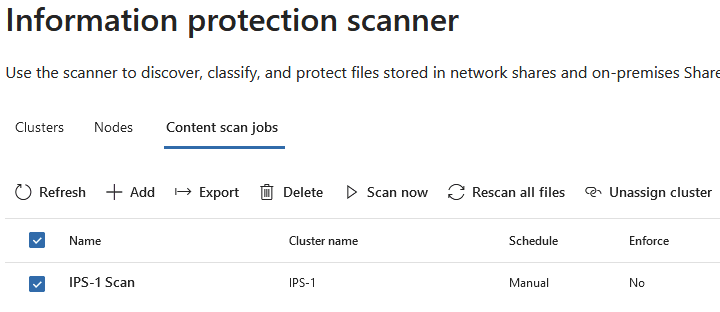
As a final step before IPS software installation, an IPS "cluster" and a content scan job need to be created in the Purview portal.
- Open the Purview portal
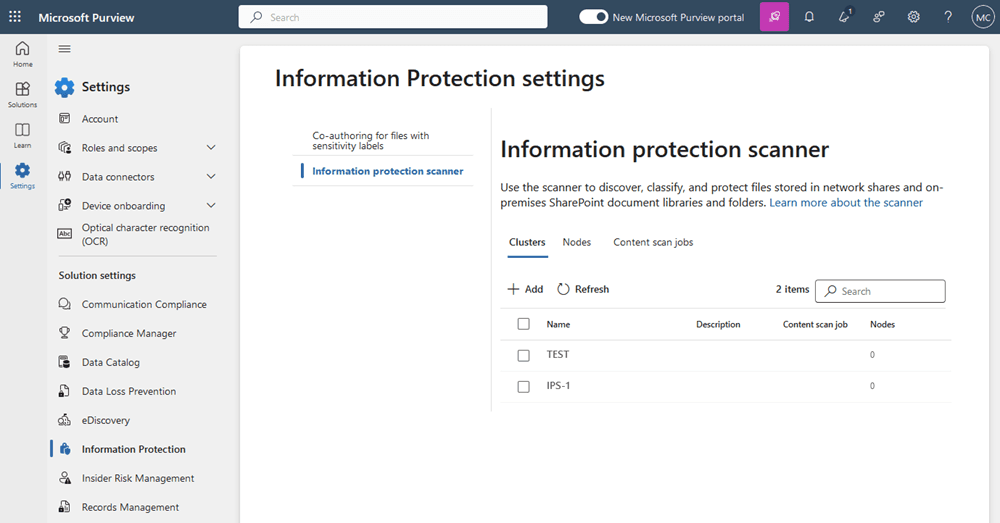
- Navigate to Settings --> Information Protection --> Information Protection Scanner
- Add a cluster
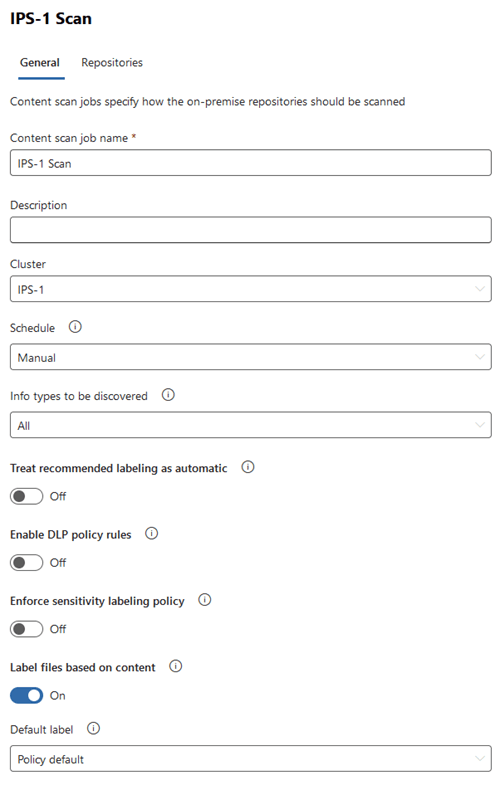
- Open the "Content scan jobs" pane and create a new job.
- Assign the job to the newly created cluster
- Ensure "Label files based on content" is selected
- Note: this does not (by itself) enforce automatic labeling but is necessary to enable data discovery
- Add a repository to the new scan job
II.E.a: Example Screenshots
- Creating a new Cluster:
- Content Scan Job settings:
II.F: IPS Installation
Now that all of the prerequisites have been met, you can perform the actual IPS installation.
Login to the scanning server and download and install the information protection client (which can be downloaded here)
Or, just run these commands:
$download = "https://download.microsoft.com/download/" + `
    "4/9/1/491251F7-46BA-46EC-B2B5-099155DD3C27/PurviewInfoProtection.exe"
$outFile = "C:\Users\Administrator\Downloads\pip.exe"
(New-Object System.Net.WebClient).DownloadFile(
    $download,
    $outFile
)
& $outFile /quiet /norestart | Out-Default # make PS wait for proc
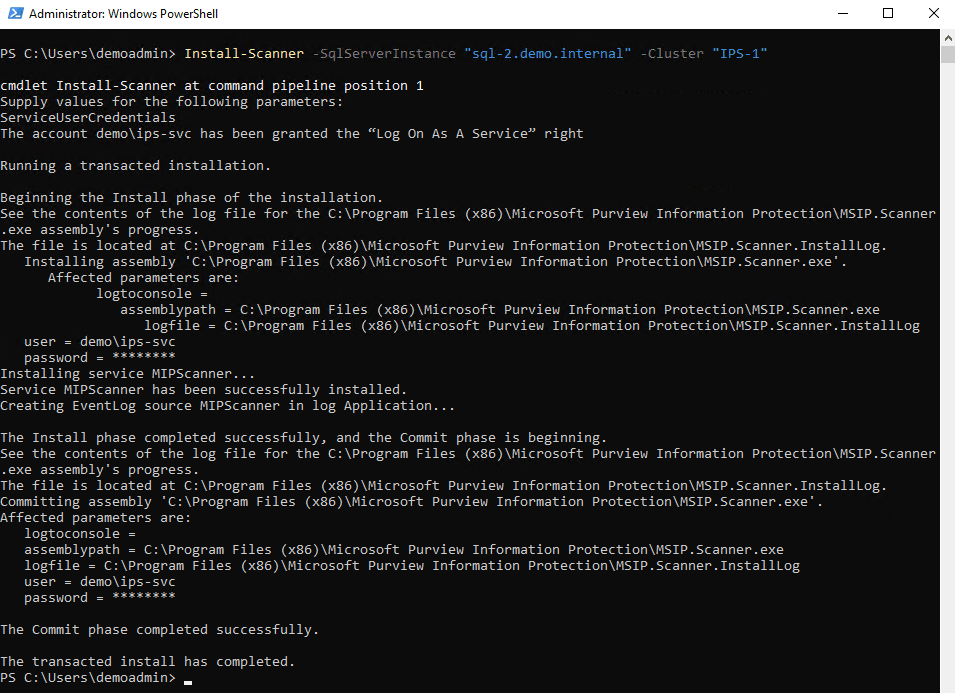
II.F.a: Install-Scanner
Run the following command in PowerShell:
# when prompted, provide the IPS service account credentials
Install-Scanner -SqlServerInstance "<YOUR SQL SERVER HOSTNAME>" -Cluster "<YOUR CLUSTER NAME>"
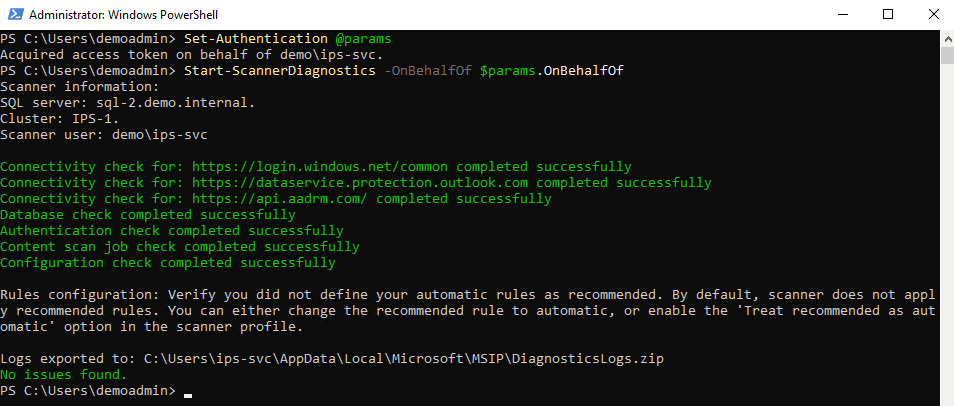
II.F.b: Set-Authentication
Run the following command(s) in PowerShell:
# when prompted, provide the IPS service account credentials
$params = @{
	OnBehalfOf = Get-Credential
	AppId = "YOUR APP REGISTRATION'S APP ID"
	AppSecret = "YOUR APP REGISTRATION'S APP SECRET"
	TenantId = "YOUR TENANT ID"
	DelegatedUser = "YOUR DELEGATE'S UPN (e.g., user@email.com)"
}
Set-Authentication @params
II.F.c: Validate
To verify the installation was successful:
# entering the IPS account credentials when prompted...
Start-ScannerDiagnostics -OnBehalfOf (Get-Credential)
II.F.d: Example Screenshots
Install-ScannerCommand:
Set-Authentication& Diagnostics Commands:
III: Start a Scan
Re-open the Purview portal and:
- Ensure that your scanning server now appears under the "Nodes" pane
- Select your content scan job and select "Scan Now"
